
Digital cameras usually produce filenames like IMG_1234 or DSC_5678, which is fine as long as you have only one device and don’t take too many pictures. As soon as you take more than 9999 pictures or have more than one device – a camera and a phone, for instance – duplication and confusion soon occur.
I produce a lot of digital images on several different devices and I wanted to have a single, consistent filename format for all of them. But creating a format that works well, isn’t too long and produces unique filenames that avoid clashes turns out to be trickier than I’d thought.
Once I started to research the subject I found there were pages and pages and pages of discussions of file name systems and best practices. I looked at all those and then worked out the format shown here.
Let’s pick it apart, then I’ll explain why I didn’t use some of the options other people suggest – and why you might want to.
My filenames look like this:
AN200410-750-5496.jpg
AN are my initials. If you’re supplying images for media use, like I do, it makes sense to have a clear indication of which images are yours.
200410 is the day the image was shot, year-month-day. The year is represented as two digits to keep the filename as short as possible – I don’t think there will ever be a situation where I’ll be confused between 1920, 2020 and 2120. The only drawback is that in 2020 the first four digits can look like a four-digit year number (the year 2004 or April ’20?) but that’s a compromise I’m prepared to accept. Month and date both use leading zeros if necessary to aid readability. Adding the date this way makes it easy to identify what the images were for and helps to avoid filename clashes.
750 is a three-character tag for the camera that shot the image, in this case my Nikon D750. Including this avoids any clashes of serial numbers (see below) and means you can easily tell which camera shot which image. That can be useful for tracking down faults. I have tags for all the cameras, phones and other devices I have that take digital images, and for all the ones I’ve used in the past. So a tag of 100 represents my first digital camera, a Nikon D100. My old iPhone 5S is I5S and my current iPhone SE is ISE – and so on. I even have tags NEG, PRI and TRA for images scanned from negatives, prints or transparencies.
1234 is the serial number produced by the camera. There’s no need to renumber the images and anyway that could get confusing where the original image still exists, for example in the Camera Roll on my phone. Keeping the four-digit serial number from the camera gives a theoretical limitation that it’s only possible to shoot 9999 images on each camera before the serial numbers start to duplicate. That’s such a remote possibility I’m prepared to chance my arm.

I add the date, but not the time to the image filename to avoid clashes without making the name too long.
Additional information
Some photographers include a job number or code in the filename so that it’s easy to find images shot for a specific job. I don’t do this because it adds extra length to the filename, and because I don’t need a code to tell me what the job or occasion was. All I need to do is look at the date code already included in my filename. I generally don’t do more than one important job per day, so effectively the date code doubles as a job code.
I’ve also seen suggestions that the time should be added, so instead of just using the date – 200410 in my example – you might have 200410204236 to indicate 36 seconds past 8.42pm. If you’re shooting thousands of images a day, and so might have trouble with the limit of 9999 per camera I mentioned above, that might be a good idea and it might be useful for some scientific purposes. But in my situation I don’t think there’s any need.
Automating filename and file import
Image management software like Adobe Bridge can do batch renaming but I wanted a method by which I could easily import image files from a memory card and rename them using my chosen format without the need to run a big application. I’m using a Mac and the answer was a bit of built-in software I never knew existed until now called Automator.
Automator is a (fairly) simple way to automate tasks. (There are similar applications for Windows and Linux.) You can download my Automator app for importing pictures here but before you use it you’ll need to set it up:
- Unzip import-pictures.zip
- Open the Import pictures document in Automator
- In the first block in the main window, labelled Run AppleScript, you will see a line which starts "choose from list" followed by a list of three-character image tags. Edit this to change the codes to suit your preferences and devices. You can have as few or as many as you like – just make sure each code is in double quotes and there are commas between them, and the whole list is in curly brackets. Each tag can be more or less than three characters if you like, but I keep all mine to three for consistency.
- At the bottom of the Automator window you will see a small button which looks like one rectangle stacked on top of another. Click this to show the Variables list.
- Double click the variable called initials. Change the text field to your initials, then click Done.
- Go to File > Convert to > Service
- Set up the service at the top of the Automator window so Service receives files or folders in Finder
- Go to Finder > Services > Service preferences to set a keyboard shortcut – I use Command-§ because § is the top-left key on my Mac keyboard, so it’s easy to remember
- Save and the service is ready to use
To use it, go to the finder and select the images to rename and import. Hit Command-§ or go to File > Services where you should see an option to Import pictures. A dialog box appears with your list of tags, and you just select one from the list and click OK. The images will be renamed, then moved from wherever they were to the Pictures folder.
How it works
You don’t need to know the details of how it works in order to use it, but if you’re interested this is what each block in the Automator workflow does:

Run AppleScript asks the user to choose a tag from the list

Set Value of Variable takes the selected tag and stores it in a variable called tag to be used later

Get Selected Finder Items picks up the images the user selected before activating the service

Rename Finder Items: Replace text searches for IMG in the image filename and replaces it with the selected tag text

Rename Finder Items: Replace text searches for DSC in the image filename and replaces it with the selected tag text - this and the block above assume that IMG or DSC will appear in the filename, so you'll need to edit this if your camera produces filenames in a different format
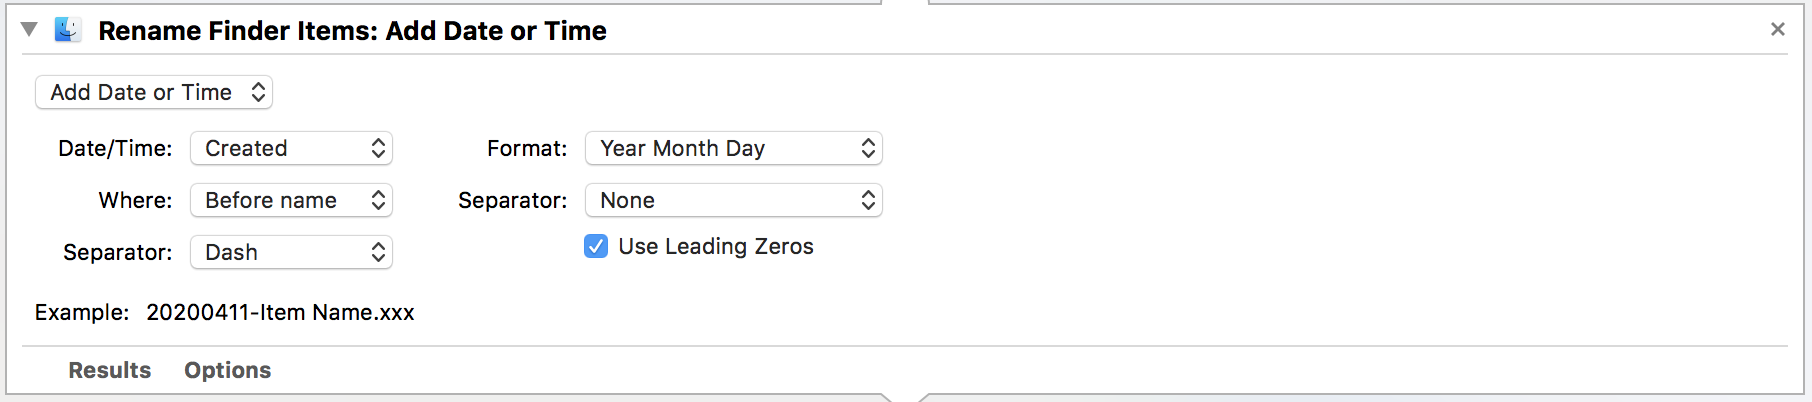
Rename Finder Items: Add Date or Time adds the date at the beginning of the filename in Year Month Day format – unfortunately Automator uses four-digit years, but that will be fixed later

Rename Finder Items: Add Text adds the initials to the start of the filename – in fact this is only here to identify the start of the text for the next operation

Rename Finder Items: Replace Text looks for the initials and “20”, the two unwanted digits of the four-digit year number, and replaces it with just the initials, so this converts the four-digit year to two digits - this will stop working properly on 1 January 2100 but as I'll be 129 by then I doubt I'll care

Rename Finder Items: Replace Text changes underscores to dashes because I think it looks neater and because dashes are separators and underscores are not – this means you can click on each part of the filename to select just that part

Move Finder Items moves the renamed files from wherever they were to the Pictures folder - you can change this to point to any folder you want
Extra features
Automator can do many other things which could be incorporated into this workflow:
- Duplicate Folder Items could be used to create back up copies of images
- Label Finder Items could apply a Finder label, for example to denote unprocessed images straight from the camera
- New PDF Contact Sheet can create a page of image thumbnails
- Import Files into Photos could be useful if you use Photos to keep track of images
I'll be experimenting with some of these in the future.