You can’t overhaul an engine or strip a gearbox in a few minutes. Retrimming a seat and repairing bodywork rust damage are not the work of a moment. But don’t let that convince you that looking after your classic inevitably means long evenings in a drafty garage, because there are many important jobs you’ll need to do which take little longer than boiling a kettle to make tea.
Now we’re not suggesting that you should skimp on maintenance, or speed through a job and in the process do it badly. A job takes the time it takes, and for the sake of your classic’s condition – and maybe for your safety – it’s essential that you invest whatever time is necessary to do it properly. But as you can see from the pages that follow, there are plenty of tasks that don’t take long to accomplish. That means with a little thought you can split your classic’s servicing into bite-size pieces, attending to the odd small job every day or two and leaving more major tasks until you have time to do them properly.
Our selection of speedy service jobs is just a starting point, of course. Your own classic might not need attention to all these areas, and it might have its own specific requirements that we haven’t covered here. But whatever you drive there will be plenty of simple, short tasks like these that you can work on when you have a minute or two to spare. And that should help to make maintaining your classic easier – and more fun.
1 Set up the spark plugs
Clean, correctly-gapped plugs are essential to keep your classic’s engine running smoothly, so periodically pull the plugs out and check them. Remember to clean the area around each one to avoid foreign material dropping into the combustion chamber – either sweep around the plug with an old paint brush, or use an air-line. Ideally you want the plugs to have a grey/brown appearance, with only light deposits. Heavy deposits suggest carburation or ignition faults , while an oily appearance indicates engine wear. Cleaning isn’t recommended for modern plugs – going at them with a wire brush isn’t a good idea. Measure the gaps using feeler gauges, adjusting the earth electrode if necessary.
2 Look after the leads
Check the HT leads with the engine off, looking along the length of each plug lead (and the ‘king lead’ running from the coil to the distributor) for any signs of cracks or deterioration in the insulating material – if any are suspect, replace the set. Wipe off any oil or grease from the leads, as this can result in ‘arcing’ from one to another. Check that all the connectors are pushed firmly onto the plugs and the connections at the distributor and coil – if one of the connectors is loose, remove the lead and squeeze the connector gently with a pair of pliers to tighten it up. Finish off by spraying a water dispersant over the leads and the connectors at both ends, to keep damp out of the ignition system.
3 Service the points
Regular checking and setting of the points gap will also pay dividends in keeping your classic running sweetly. Look out for pitting on the face of one of the contacts, often accompanied by a ‘pip’ of deposited metal on the other, which will prevent you being able to measure the gap correctly. You can clean up the faces using a file, but eventually the points will need to be replaced. Use feeler gauges to measure the gap. To adjust, slacken the securing screw and move the fixed contact, then tighten the screw – and recheck the gap, because it can sometimes change when the screw is tightened. While you’re in there, apply a little grease to the operating cam and the ‘heel’ of the points.
4 Lubricate engine ancillaries
The distributor will benefit from a few drops of light oil at the top of the shaft to lubricate the bearings. When you then refit the rotor arm you can check for wear by trying to rock the arm from side to side – there should be a tiny amount of movement, but if the motion is considerable the distributor’s bearings are worn and as a result the ignition timing will be all over the place. If there are gaps in the baseplate you should be able to drop a little oil into the advance mechanism. If you have the older type of dynamo fitted on your classic, it won’t have ‘sealed for life’ bearings. On these dynamos you willl find an oil hole at the back, opposite the drive pulley.
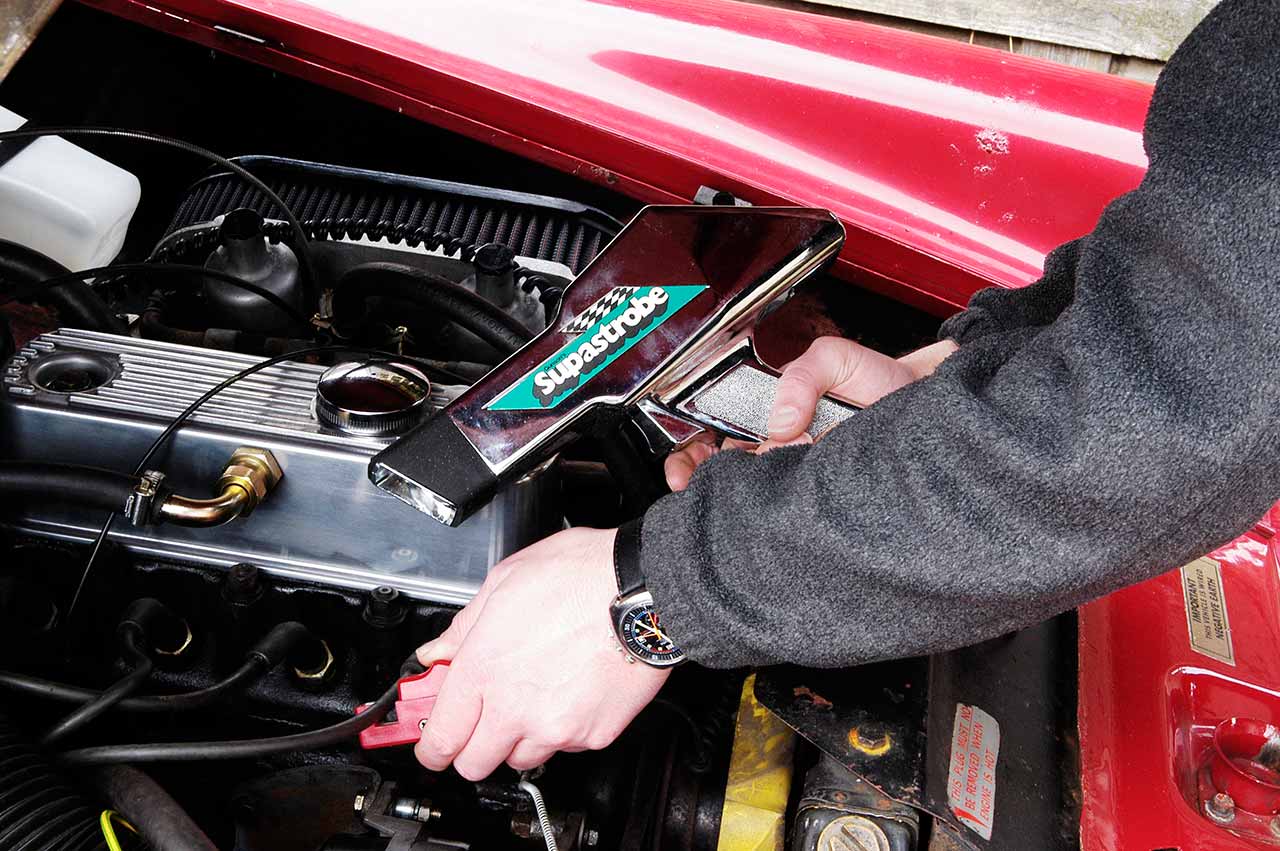
5 Set the static timing
Checking the ignition timing is another worthwhile job which won’t take long. Get yourself a decent stroboscopic timing light, preferably with a xenon lamp – these are much brighter than neon timing lights, which makes it easier to see the timing marks in a dark engine bay. It’s also helpful to have a timing light on which you can set the required timing advance. If your classic is positive earth or has 6-volt electrics, power the timing light from an auxiliary 12-volt battery. Make sure you check the timing at the engine speed quoted in your workshop manual, and with any vacuum advance connected or disconnected as the manual states – otherwise you’ll carefully set the timing to the wrong figure.
6 Keep an eye on hoses
Give each water hose a good squeeze and look for any cracks starting to form: these cracks will take a while to go through the hose completely, but if they are visible when you squeeze the hose it means it’s time to think about replacement. Pay particular attention to any hose which has to turn a corner, as these often crack on the outside of the bend. Also prone to failure are hoses which are subjected to high temperatures due to proximity with the exhaust manifold. Check, too, that the clips retaining all the hoses are tight. Once you’ve looked at the coolant hoses, do the same thing with any flexible fuel pipes, and any hydraulic hoses fitted to your classic for braking, steering or suspension systems.
7 Tidy hoses, wiring and cables
As you look over the hoses in the engine bay, you might well find that clips intended to keep the hoses in place have disappeared or detached themselves. Replace any that have gone completely, and refit those that have worked loose. Do the same thing with wiring runs, and operating cables ¬– for throttle, choke, bonnet catch and perhaps even radiator blinds. Keeping hoses, wiring and operating cables neatly clipped in place is important for three reasons – it improves the engine bay appearance, improves reliability because things cannot flap about and break, and makes working on the engine quicker and easier. So don’t ignore it – replace any missing clips, and keep all everything neat.
8 Check and top up fluids
The list of fluids that require checking will vary depending on the classic you run. You’ll probably have a brake fluid reservoir to check, and maybe a hydraulic clutch reservoir (or you might have a hydraulic clutch that shares its fluid with the braking system). If you have cooling water to check, the level will be measured either at the radiator or in a separate header tank – brightly-coloured anti-freeze makes it easier to see. You might also have hydraulic reservoirs for power steering or self-levelling suspension, and you’ll have oil – which we’ll get to in a moment. Whenever you top up a fluid, ask yourself where it went – most classics will consume oil and water, but a big drop could be a sign of trouble in store.
9 Look at oil level and condition
The procedure of removing the dipstick, wiping it, reinserting it and then removing it again to take the reading will, no doubt, be second nature. Remember not to check the level immediately after the engine has run, as it takes a while for the oil in the engine to drain back into the sump to give you a correct reading. Even new oil will look black very quickly, as a result of the additives in the oil cleaning the engine and holding dirt in suspension. As you take the reading from the dipstick, rub some of the oil between your fingers – it should feel smooth, not gritty. On some overhead-cam engine you can remove the oil filler cap and reach inside with a finger to rub one of the cam lobes, feeling for wear.
10 Adjust drive belt tensions
You’ll probably have a belt driving the fan and the dynamo or alternator, though on later cars this ‘fan belt’ will just drive the generator. The same belt may also drive the water pump, and depending on what is fitted to your classic there could be other drive belts for power steering, air conditioning and other systems. Each belt needs to be correctly tensioned to do its job properly, and too tight a belt is almost as bad as too slack – because it will eventually wreck the bearings in the device it is driving. Check you manual for specific advice on belt tensions, but a good rule of thumb is too tighten the belt until you can just twist it through 90 degrees with your fingers in the middle of the belt’s longest run.
11 Look after the electrics
Heart of the electrical system is the battery, and you can get a simple estimate of the state of the battery by checking its voltage – like taking its pulse. On 12-volt system, you should find that the voltage across the battery is 12V or slightly more when the engine is not running, drops below 12 volts during cranking and then runs at 13-14V with the engine running. Unless you have a ‘maintenance free’ battery, keep an eye on the electrolyte levels, topping up as necessary with distilled water. If the same cells always needs topping up, look for cracks in the casing. If all the cells lose electrolyte, the battery is probably being overcharged. Check regularly that all connections are sound and secure.
12 Lubricate linkages and hinges
A job that often gets forgotten, but it pays dividends in convenience, reliability and potentially also in safety. Hinges will squeak and start to wear if lubrication is neglected, so go round them with an oil can on a regular basis, moving the hinge back and forth to work the oil into the mechanism. Remember to oil bonnet and boot hinges as well as door hinges, and to grease lock pins and latches. Lubricating rod brakes and throttle linkages can make the car nicer to drive, as well as avoiding partial seizures which can do your blood pressure no good at all. It’s important to keep linkages well adjusted, too, though that might take a little longer than just applying a drop or two of oil: set aside time to do it properly.
13 Inspect the exhaust
There isn’t much maintenance you can do under your classic without spending a fair amount of time jacking and securing and lying on the floor – unless you have a garage with a lift or a pit. But you can perform a visual check on the underbody and in particular on the exhaust, looking for corrosion and impact damage to the system. A powerful torch helps, and strangely it’s often easier to see under the car at night – because your eyes are adjusted to gloom instead sunlight. If you can reach the exhaust and its hangers you can try waggling the exhaust pipe – it should be flexibly mounted, but still retained in position – and squeezing any rubber ‘doughnuts’ just as you would a heater hose, to look for cracks.
Planning the job
There’s no substitute for prior planning if you want to make sure a job goes smoothly and takes as little time as possible. Before you get going, read the relevant section in the workshop manual and get the procedure straight in your mind – you don’t want to be reading it for the first time while you’re on the job. Then work out which tools you are going to need, and collect them together. Also decide what spares, if any, you are going to need and make sure you have them – consider, too, whether you might need replacements for torn gaskets or disintegrating seals which are not likely to become apparent before you start the job. Again, collect together everything you’ll need before you start.
Once you’re working, you should still be planning ahead. Whenever you remove a component from the car, note the orientation in which it was fitted if that is relevant. Write notes or draw diagrams to remind yourself. As you remove things put them down in order, so they’re easy to find when refitting – and for tiny components like nuts, get a container like a biscuit tin or an old hubcap to keep them in. If you don’t lose anything, the job will be that much quicker.
14 Grease chassis and suspension
Many classics have stringent greasing requirements, and it’s wise not to put off attention with the grease gun. You may not be able to get round all of your classic’s grease points in a short session, particularly if you need to jack up the car and remove wheels for access to suspension or chassis grease nipples. But you might be able to divide the job into several smaller ones, taking one end or one corner at a time. Clean off any road dirt or hardened grease from around a grease nipple before you apply the gun, and don’t just give it a squirt – keep going until clean grease exudes from the nipple or the joint. That way you’re not only lubricating, but cleaning too. Wipe away any excess.
15 Check-tighten fixings
A worthwhile way to spend a few minutes is to go round every nut, bolt and screw on your classic, making sure they are tight. Old cars seem to have an infinite capacity for vibrating things loose. Get to know if anything on your car is always coming undone, and pay particular attention to it – you might even consider replacing an always-loose nut with a Nylock, or adding a lock nut if there’s enough exposed thread on the bolt. Or you can apply a thread lock to ensure things don’t shake loose. Where possible, tighten nuts and bolts to a specified torque using a torque wrench – it’s not necessary to try to tighten any further, and can often cause damage to the fixings if you do.
16 Caring for your tyres
Tyres usually don’t get nearly as much maintenance as they should, given that they are our only contact with the road. Check the pressures regularly using a good pressure gauge and correct any deficiencies at once. Note if one tyre always needs air – is there a slow puncture? Look carefully for any cracks or abrasions to the tyre sidewalls, as these can cause sudden tyre failures at high speed. Inspect the tyre tread regularly, ensuring you have a good thickness of tread across the whole tyre – the legal minimum is just 1.6mm, but for safety you really want double that. Feel around the tread of the tyre for stones and foreign bodies in the tread – remove them before they cause a puncture.
17 Check wipers and washers
For safety’s sake it’s wise to keep the wipers and washers in good order. The wiper mechanism will have been part of your lubrication routine, but take a look at the rest of the system, too. Run your thumb down each wiper blade in turn – if the edge of the blade feels rough then the wiper rubbers are worn and should be replaced. Look for water leaks in the washer pipework, and check the aim of the washer jets – the jets of water should hit the windscreen about in the centre, or slightly higher. On many cars the jets are affected by the airflow over the bonnet, so check them out on the road and then make adjustments if necessary.
18 Keep lights and windows clean
Here’s another safety job. Keeping the windows and lights clean is an obvious must for visibility, and it’s often the lights rather than the windows that get neglected – you can tell if the windows are dirty because you can’t see through them, but it isn’t as easy to notice that the lights aren’t as efficient as they should be. If your classic is dirty but you don’t have time to wash it, at least give the windows and lights a clean – it’ll only take a minute or two. Glass cleaners work well on both windows and lights, but even a good rub with a damp rag is better than nothing as it will remove most of the road dirt and give you fighting chance of seeing where you’re going.